Garbage disposals are incredibly convenient appliances that help maintain a clean kitchen by disposing of food waste efficiently. However, they can also become jammed from time to time, leading to frustration and potentially costly repairs if not handled correctly. Knowing how to troubleshoot and fix a jammed garbage disposal can save you time and money. This comprehensive step-by-step guide will walk you through the process of tackling a jammed garbage disposal, ensuring that you can get your kitchen back to its normal working order in no time.
Understanding Your Garbage Disposal
Before we dive into troubleshooting, it is important to understand how a garbage disposal works. A garbage disposal consists of a grinding chamber with blades that shred food waste into tiny particles, which can then be flushed down the drain. The disposal is powered by an electric motor that spins the blades at high speeds.
Common causes of jams include:
- Foreign Objects: Sometimes, hard or non-food items accidentally fall into the disposal.
- Overloading: Putting too much food waste into the disposal at one time can cause it to jam.
- Hard Foods: Grinding hard foods, such as bones or large pieces of fruit pits, can also lead to a jam.
- Fibrous Foods: Foods such as celery strings and corn husks can wrap around the blades, preventing them from turning.
Knowing these causes can help you avoid jams in the future and understand how to troubleshoot effectively when they occur.
Step 1: Turn Off the Power
Before attempting any repairs on your garbage disposal, it is critical to ensure your safety. Follow these steps:
Locate the Power Source: Find the switch that controls the garbage disposal on your countertop. If you cannot identify it easily, turn off the power at the circuit breaker. This step is essential to avoid electric shock when you are working on the disposal.
Unplug the Disposal: If it is accessible, unplug the garbage disposal to ensure no power is reaching the unit while you are troubleshooting. If it is hardwired, ensure the circuit is turned off at the breaker.
Step 2: Identify the Source of the Jam
Now that you have powered down the disposal, you need to figure out what is causing the jam.
Listen for Sounds: After turning off the power, turn the disposal back on briefly to listen for humming or grinding sounds. If you hear a humming sound, this often indicates that the motor is stuck due to a jam.
Visual Inspection: Use a flashlight to look down into the grinding chamber through the sink. While it is not safe to reach in at this stage, you can observe if any large foreign objects or food waste appear to be causing the jam.
Step 3: Manually Free the Jam

If you suspect that your garbage disposal is jammed, you can attempt to free the blockage manually. Follow these steps:
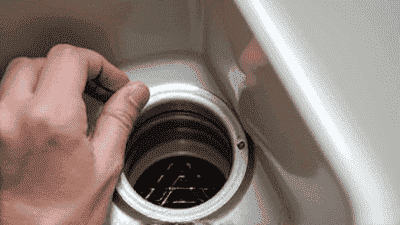
Locate the Hex Socket: Many disposals come equipped with a hex socket at the bottom of the unit. This socket is used to manually rotate the disposal blades. Using a wrench that fits the socket (usually a 1/4 inch hex wrench), you can manually turn the blades to help free the jam.
Rotate the Blades: Insert the wrench into the socket and turn it back and forth gently. If it turns freely, this means the jam has been cleared. If you still feel resistance, it indicates that there may be a stubborn blockage.
Use Tongs or Pliers for Object Removal: If you can identify the foreign object causing the jam, you can use tongs or pliers (never use your hands) to carefully remove it from the sink. Ensure not to push it further down the drain while attempting to retrieve it.
Step 4: Check for a Reset Button
Most garbage disposals feature a reset button located on the bottom of the unit. This is a safety mechanism that turns off the disposal if it overheats or jams.
Inspect the Disposal: After the blockage appears to be free, locate the reset button, typically colored red or yellow.
Press the Reset Button: Push the reset button to restore power functionality. If the button pops back out, then the disposal requires further troubleshooting.
Step 5: Rinse the Disposal with Water

Once you have manually cleared the jam and reset the disposal, it is essential to rinse it before attempting to put food waste back into it.
Turn the Power Back On: With the reset button pressed and the jam cleared, turn the power back on to the garbage disposal at the circuit breaker.
Run Cold Water: Turn on the cold water in the sink and let it flow for about 30 seconds before and after you turn on the disposal. This helps wash away any small debris and ensures that the blades do not encounter any further obstruction.
Step 6: Test the Disposal
Turn on the Disposal: With the cold water running, turn the disposal on. Listen for any unusual sounds. If it runs smoothly and without noise, congratulations! You have successfully resolved the jam.
Monitor Performance: For the next several usages, pay attention to how food waste is processed by the disposal to ensure it is functioning properly.
Preventing Future Jams
If you frequently encounter jams, consider implementing the following preventative measures:
1. Proper Usage
- Avoid Overloading: Avoid filling the disposal with large amounts of food waste at one time. Instead, feed it smaller portions gradually.
- Use Cold Water: Always run cold water before, during, and after using the disposal. Cold water helps solidify fats and grease, enabling efficient grinding.
2. Be Mindful of What Goes In
Be aware of what you’re placing in the disposal:
- Do Not Overlook Harmful Foods: Avoid putting hard items (such as bones, fruit pits, and hard vegetable stems) or fibrous foods (like corn husks, celery, and potato peels). Limit waste to softer items like vegetable and fruit scraps.
3. Regular Maintenance
Monthly Cleaning: Clean the disposal monthly using a mixture of baking soda and vinegar. Pour half a cup of baking soda followed by half a cup of vinegar into the disposal. Allow it to fizz for 10 minutes, then rinse with hot water.
Use Ice and Salt: Grinding ice cubes along with salt is another effective cleaning method that sharpens the blades and helps remove any grease or debris stuck in the grinding chamber.
Troubleshooting Other Common Disposal Issues
Should your disposal experience problems beyond just jamming, it is helpful to know how to handle other common issues:
Problem 1: Disposal Hums with No Grinding
If your disposal hums but does not grind, it may be an indication of a jam. Follow the steps provided above to free the jam.
Problem 2: Disposal Won’t Turn On at All
If the disposal stays silent and will not turn on:
- Check the Power: Make sure that it is plugged in and that the circuit breaker has not tripped. If the power is fine and the disposal still won’t turn on, the reset button may need to be pressed.
Problem 3: Leaking Disposal
If you notice water pooling beneath the sink:
Identify the Source: Check the connections between the disposal and sink, as well as the drain pipe. If you see loose connections, they need to be tightened.
Inspect Seals: Examine the rubber gasket or seals for wear and replace them if necessary.
Problem 4: Foul Odors
If you begin to notice unpleasant odors emanating from the disposal:
Regular Cleaning: Remember to clean it consistently, using baking soda and vinegar, or grind up citrus peels to freshen it.
Check for Stuck Food: Inspect the grinding chamber for any stuck food particles that could be causing the smell.
Problem 5: Slow Drainage
If your sink drains slowly, check for clogs:
Inspect the P-Trap: Remove the P-trap (the curved pipe beneath the sink) and clean it out if you suspect a clog.
Rinse the Disposal: Follow the cleaning methods described to ensure your disposal does not have built-up waste.
Conclusion
Handling a jammed garbage disposal can feel daunting, but with the right knowledge and a step-by-step approach, you can tackle it confidently. Always prioritize safety by disconnecting the power supply before performing any maintenance or repairs. By following this step-by-step guide, you can effectively identify the source of a jam, free the blockage, and return your disposal to normal operation.
In addition to fixing jams, adopting best practices for usage, maintenance, and prevention will help keep your garbage disposal functioning efficiently for years to come. Remember to respect what you place in the disposal and perform regular cleanings to maintain optimal performance. Should you encounter persistent issues or have concerns that go beyond your expertise, do not hesitate to contact a professional plumber for assistance. With a bit of care and diligence, your garbage disposal will serve you well as a reliable tool in your kitchen.